
Hello, friend! I’ve done lots of projects where I decoupage paper or napkins onto furniture and home decor, but I’ve never done an all-in-one post where you can find all my best tips to decoupage furniture… until now.
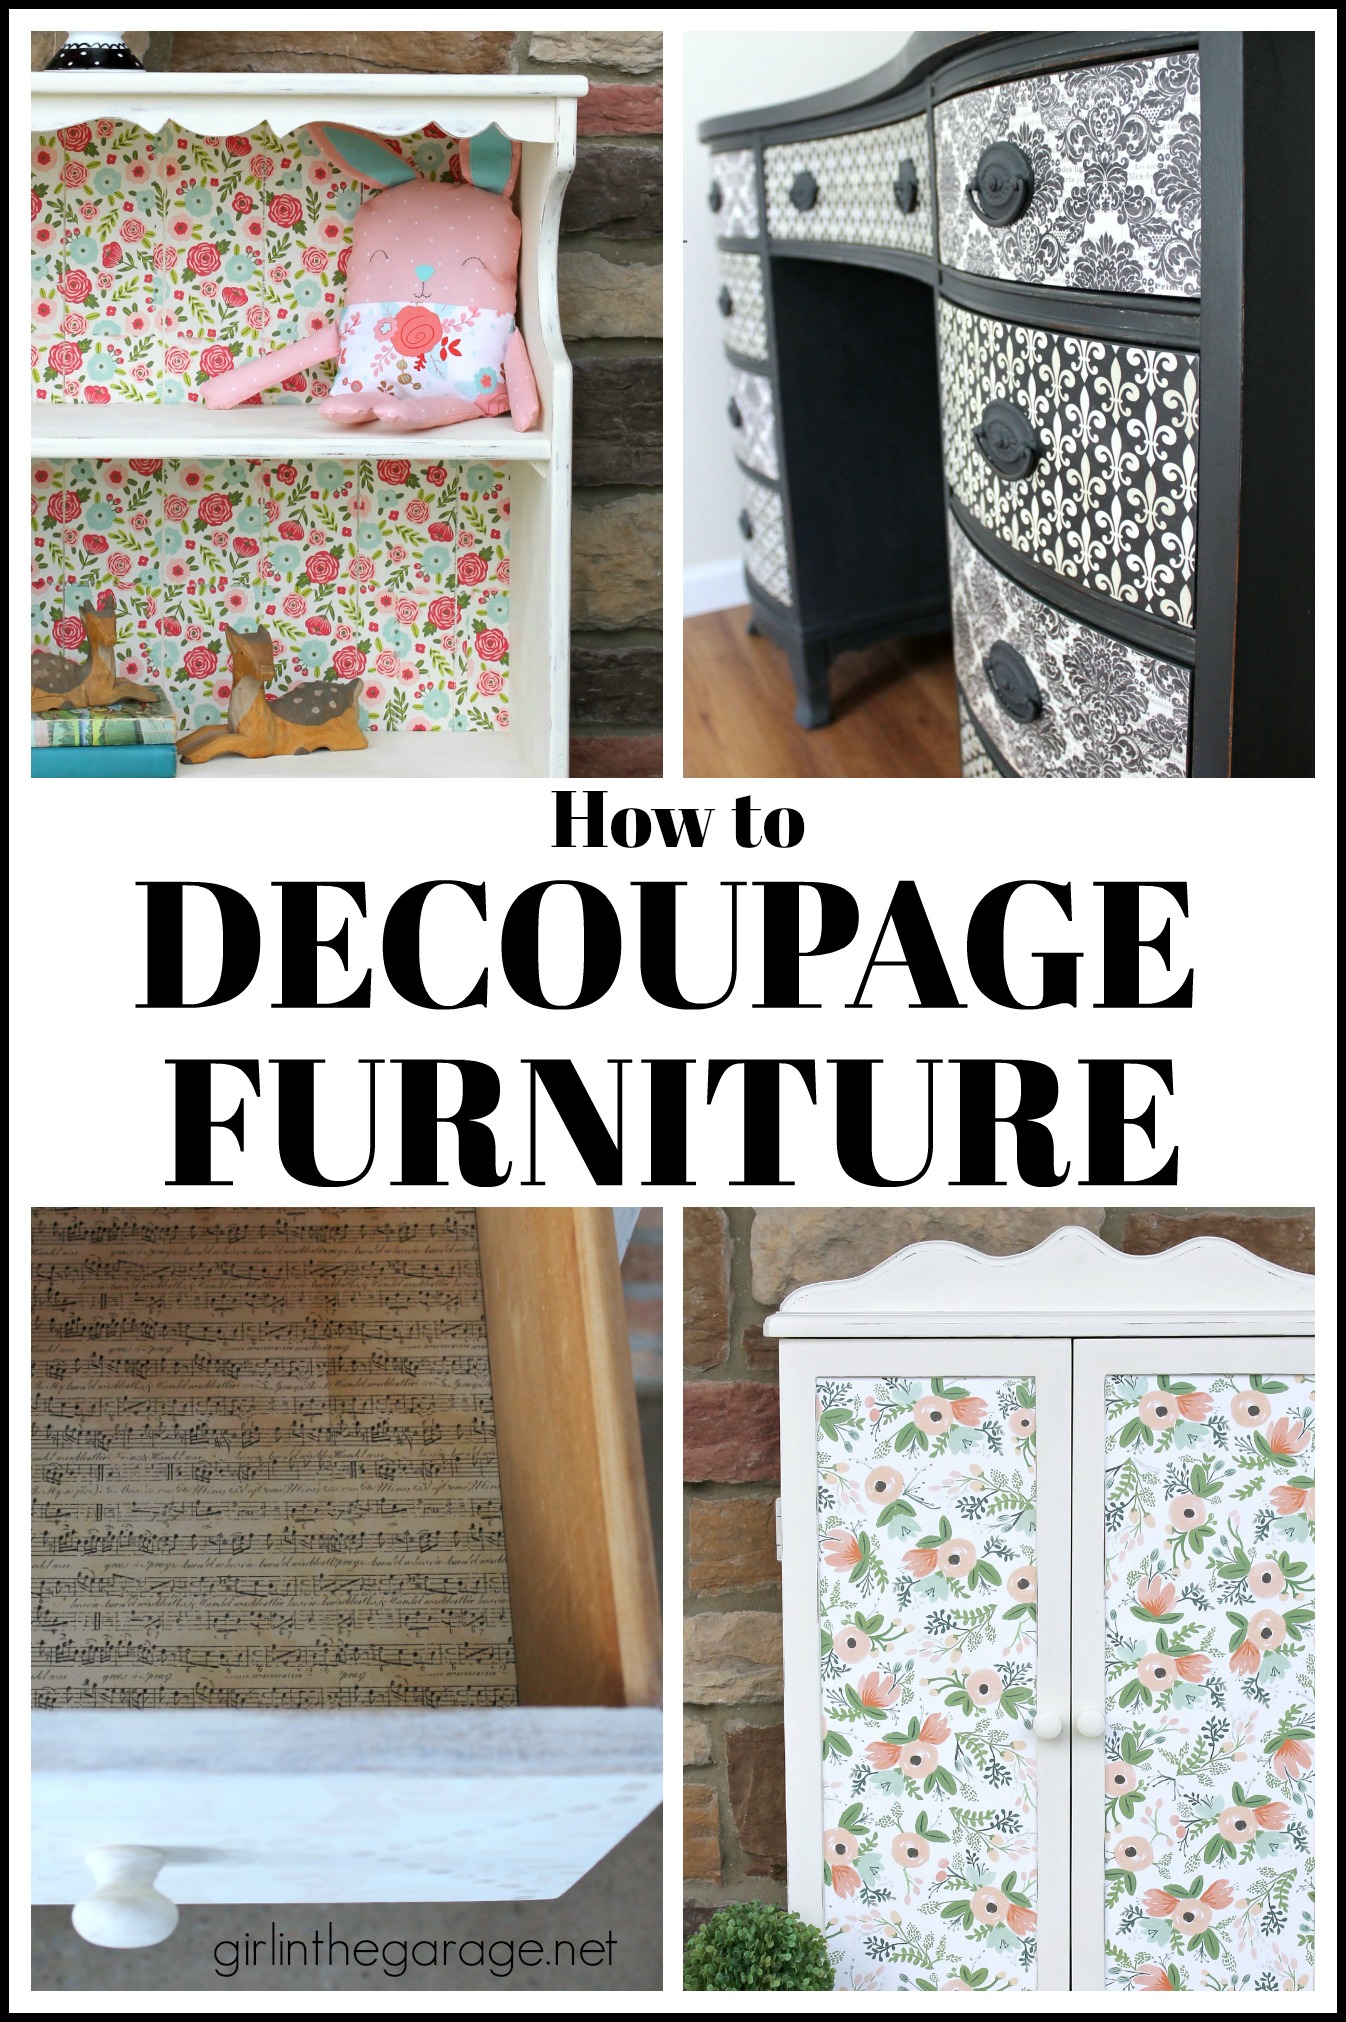
We’ll go through a few examples of different types of decoupage makeovers so you can easily follow along – one example is this petite bookcase I’ve shared before:

Today is Furniture Fixer Uppers day with my creative blogging friends! You can see their makeovers at the bottom of this post. Also, this post contains some affiliate links so you can easily find the products I use and recommend. See an updated list of all my favorite DIY products here.
You can read the entire blog post for this floral bookcase makeover here. But let’s start with a few tips for getting your piece prepped for decoupage (the photos below come from several makeovers).
How to prep furniture for decoupage
First, make any necessary major repairs or structural updates. I removed the rail on the bookcase and filled the holes (I now recommend this Elmer’s wood filler instead of Minwax.)

Then, if your piece is very shiny, lightly sand it all over with 220-grit sandpaper.

If you’re doing the back of a bookcase or cabinet, it’s typically easier to remove the back panel before painting or papering.
Next you may want to prime your piece with at least 1-2 coats so the paint can stick to it better. I recommend priming laminate pieces, raw (unpainted) wood, and any type of wood that might bleed through like cherry – or oak which tends to drink up paint. Here’s a link to my favorite primer.

Sand the piece with 320-grit sandpaper so it’s smooth to the touch.
If you haven’t already, decide where you’re going to decoupage. It can be the back of a bookcase or cabinet, on the front of dresser drawers or cabinet doors, inside drawers (excellent for hiding old ink spills!), or maybe even the top of a table.

There are many paper options when you’re planning to decoupage furniture: scrapbook paper, wrapping paper, wallpaper, napkins, maps, sheet music, book pages, even fabric. Choose one that you like (thicker papers are easier to work with if you’re a beginner) and then paint the piece in a coordinating color.

Give it at least 2 coats of paint depending on the color you chose (white, red, and black usually need more but it depends on the type of paint).
Then measure the dimensions that you’ll need for the paper. For antiques (and inside drawers), measure the length of every side because parallel sides might not be exactly the same!

For smaller sheets, I always cut with my handy paper cutter so the lines are perfectly straight. For larger paper like gift wrap, I use a yardstick, draw lines on the back side with a pencil, and then cut with scissors.
Lay out the paper to make sure it will fit perfectly.

How to decoupage furniture with Mod Podge
Next, when you decoupage furniture use a product like matte Mod Podge so if you get a little messy, the glue won’t dry shiny and obvious. Also I like to use a foam brush – you can buy a big pack for cheap.

For the little bookcase makeover, I used the floral napkins above. Napkins can be trickier because they’re so thin – pull apart all the layers (there are usually 2 or 3) and only use the patterned layer.
I’ve also used napkins to decoupage wooden crates and they turn out so pretty! Read more about how I decoupage crates with napkins here.

Here are some gorgeous floral napkins available online.
If you have a large area, work in smaller sections – maybe 8-10 inches at a time. See how much you’re comfortable working with. You’ll get into a nice groove after 1-2 sections.
Gently brush a layer of Mod Podge onto the section, covering it completely. Don’t make it too thick or too thin. It dries pretty fast so try to work quickly.

Once the area is covered, oh-so-gently lay the paper onto that area starting with the edge first and then pressing away from it. Rub the paper for a few minutes, pressing out any trapped air bubbles.
If you rub with your hands, the ink may transfer onto your skin. You may want to rub with something else that won’t tear the paper.

Keep going until all of the paper is completely glued on. Leave it alone to dry for at least a few hours.

Depending on where the paper was glued, you may want to protect it with 1-2 coats of matte Mod Podge over the top of the paper. For example, the back of a bookcase wouldn’t get much usage like a drawer or door would.
Here’s how the sweet decoupage bookcase turned out:

Adorable! Here’s the link again to the full tutorial for this bookcase makeover.
And here are other decoupage furniture projects I’ve done – some were referenced above in this post:
 1. Cabinet Makeover with Gift Wrap – 2. End Table – 3. Napkin Crate
4. French Desk – 5. Repurposed Drawers to Shelves – 6. Garage Organizer
7. Antique Vanity – 8. Bookcase Makeover – 9. Dresser with Paintable Wallpaper
You can also learn how to decoupage fabric onto books like in this project:

* I would so appreciate if you would pin or share this post with a friend – thank you! *
.
Plus it’s also Furniture Fixer Uppers day with my creative friends…
Below are the Before photos – visit the links underneath to see the Afters and to learn how they did it. (I can’t wait to see them myself!)
 1. Confessions of a Serial DIYer
2. Just the Woods
3. Petticoat Junktion
4. Prodigal Pieces
5. The Interior Frugalista

How to Decoupage and Distress with Napkins
Enter your email below to have this free printable tutorial sent to you for handy reference.


Larissa ~ Prodigal Pieces says
Nothing better than a fun refresh. So cute!
kandice kullmann says
I am a big decoupage lover! thanks jen
Marie B. says
I love decoupaging and you offer some great tips in here, Jen!
Christy James says
Love all of these, Jen! Pretty paper just adds so much! Merry Christmas!! XOXO
Pam K says
I spray my decorative paper with a clear acrylic spray sealer (Mod Podge brand has one) before I apply it to the surface of my piece. This only works with paper…not napkins or tissue. It helps to reduce bubbling and reduces the risk of tearing.
Jen, Girl in the Garage says
Great tip, Pam – thanks for sharing!