
Welcome back, friend. Today I’m excited to share a new tutorial for this small nightstand that I found at an estate sale last weekend for only $10.
My first thought was “card catalog!” – but I do a lot of faux card catalog makeovers, so instead I went with something a little different and more industrial. For this project, I’ll show you how to create a vintage trunk painted nightstand – AKA how to transform the piece below into a faux steamer trunk. (Plus there’s a short helpful video too.)

It didn’t have a price tag, so when the worker said $10 I practically snatched right it up! (There were so many dishes on it)
*This post contains some affiliate links so you can easily find the products I use and recommend. Discover all my favorite tools and brands for doing DIY makeovers here.
It’s a sturdy wooden piece (I’m calling it a small nightstand) with a sticker on the back that said “Made in Indonesia.” It reminds me of The Bombay Company.
The first step was to gently clean it. Then remove the old hardware and fill the holes with wood filler to prep for new pulls.

If I was going to paint this a light color, this red-toned wood would definitely need a couple coats of shellac primer to avoid bleed through – but this piece is going dark, so no need for primer. Read more about How to Prep Furniture for Painting here.
Next the nightstand was painted in Graphite Chalk Paint by Annie Sloan (it’s dark gray – like a chalkboard) with one of my favorite Purdy paint brushes (I’ve used the same ones for years – they last forever).

It’s just a base coat, so no need for perfect coverage.
When the paint was dry I went back and sanded over the dried wood filler with 220-grit sandpaper.

The next layer was Chalk Paint in Honfleur (brown).
The goal was to make the nightstand look like a faded leather steamer trunk with lots of character.

Finally I added another layer of Graphite over the Honfleur, making sure to let the brown peek through in many areas.
You can also achieve this layered look by distressing, but I wanted a textured finish instead of a smooth finish, so I didn’t do any sanding after the paint dried.

Next it was time to add upholstery tacks around the drawer fronts. I love using upholstery tacks to add something special to makeovers (this nailhead vanity featured in BHG, this vanity, this suitcase dresser) and they’re the perfect accessory for a painted trunk nightstand.
Below are the supplies I used. You can find a great assortment of upholstery tacks in various colors here.

Working with upholstery tacks on wood can be tricky – measure where you want the tacks to go, be careful not to hammer your fingers, use needlenose pliers to hold the tack in place until it’s secure, and hit the hammer as straight as possible on the head.
Without fail, I always have a few mishaps and have to pull out a wonky tack – the flathead screwdriver, pliers, and hammer come in handy for that too.
I found these amazing leather pulls on Amazon – a 6-pack for less than $9. You can’t beat that! They also come in brown, so I’m definitely going to order more for future projects.

With these pulls, you get to decide where you want the holes to go. You want the leather to curve enough so your hand can comfortably open the drawer without your knuckles bumping into it.
Mark the spots and then drill new holes. (My drill/driver takes care of this easily.)

Finally, I found some decorative metal brackets at Hobby Lobby and added two to give it more of that vintage steamer trunk look. Plus they were already black and brown, yeay!

And now for the final result of the painted vintage trunk nightstand…

I had a vision of this project and it turned out almost better than I imagined – it’s definitely one of my new favorites!
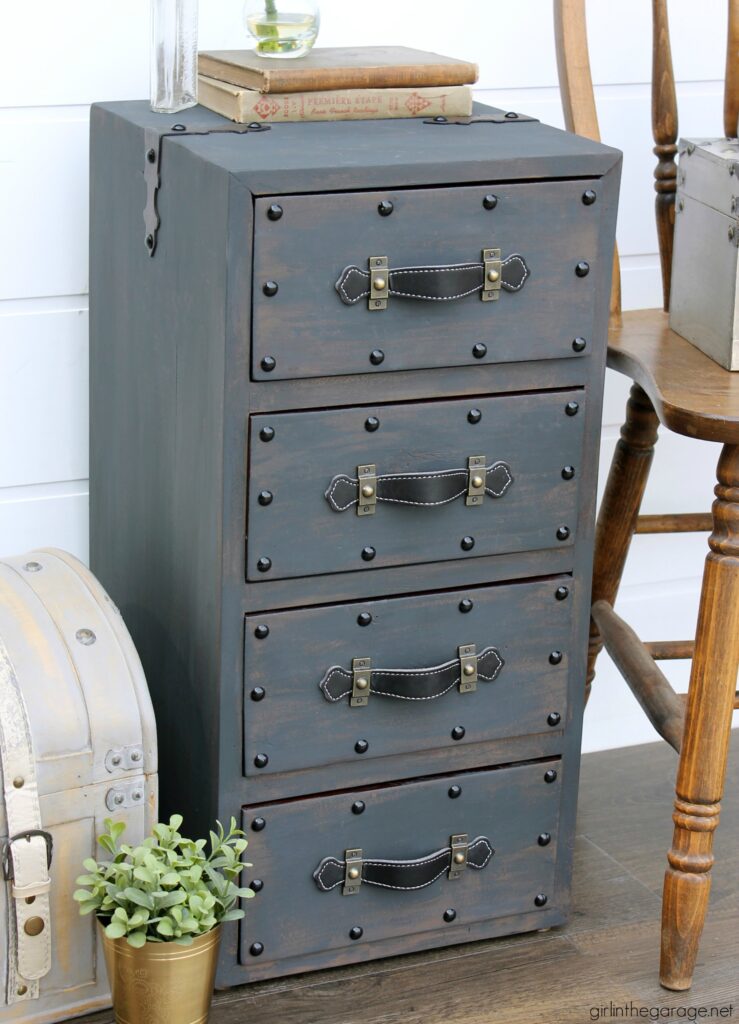
Do you think it looks like an antique steamer trunk? I can’t decide if it looks more like leather or metal to me.

Either way, I love it – and I hope you like today’s tutorial too. I’d love to know your thoughts!

As always, feel free to Pin or share this project to find it easily later. I appreciate you!

Here are a few more Trash to Treasure makeovers from my creative blogging friends – I’m always amazed at the ideas they come up with. Below are the Before photos – visit the links underneath to see the Afters and to learn how they did it:
 1. Artsy Chicks Rule
2. Salvaged Inspirations
3. Confessions of a Serial DIYer
4. Prodigal Pieces


Heather says
OMG!! I love it!! My mouth literally dropped open when I saw the finished product.
Larissa ~ Prodigal Pieces says
So fun!! I love the new (old) look, Jen. The handles rock. 😊
Lorri says
Awesome..love the upholstery tacks.. looks very old to me. Very creative. I love the look of it and the way you styled with your other treasures. Out of the park!!!!
gwen says
it looks super! i like the old drawer pulls, but the new ones look great as a steamer trunk vibe and the latches on the top sides really add to that.
i’ve also had problems with those tacks, and i’ve found that drilling tiny pilot holes makes them go in perfectly straight. (no wasted tacks!)
Lisa says
WOW~ WAY cool!
Cheryl Atkinson says
Hi Jen! What an awesome piece. I love it.
Denise - salvagedinspirations.com says
This is spectacular Jen! It looks more like metal to me. I LOVE it!! XOXO
Sue H Mellette says
I really like what you did to transform this piece! It certainly looks more like leather to me. The addition of the leather pulls and the tacks really complete the look! Thanks for sharing.
MACHADO SANTOS says
Amazing, amazing work!
Christy James says
This has to be one of my favorite pieces of yours!! It looks amazing!! It looks like metal to me and I love everything about it!! XOXO
Julia says
Wow! I love this trunk-like piece! Beautiful vision and outcome. Traveled her from Christy’s blog 🙂
Marietta Walker says
Absolutely fantastic. What an amazing transformation and those leather pulls. They are in my cart!
Mary Loveland says
Looks really really good! Quite the surprise, job well done!
p says
This truly is a Favorite !! Leather or metal look – It’s wonderful. 😉
Great vision for this piece. Great use of ‘details’.
The top mounted hardware is genius.
I purchased Honfleur and graphite (several) months ago, but have been pondering how
to get a soft layered look. You nailed it for sure !!
A Q: if you wanted a smoother finish – would you sand between each layer of paint –
or at the end…?
Thanks for sharing your inspiring work. Amazing !
p
Rebecca Payne says
I love the great job you have done. So creative. Thank you for sharing.
Marian says
Oh Jen, what a terrific project! You really hit the nail on the head. He He Your steamer trunk turned out perfect. I love everything about it.
SONJA HANSEN says
It is amazing. Doesn’t have to look just like something else. You gave its own new identity. Congrats.
Meena Scott says
I usually like your projects, but on this one I liked the style of the “before” better. Your makeover is very clever and well done, though. 😀
Donna says
What a great vision! I love how that turned out!
Ann Bilyeu says
I absolutely love this one and now I’m going to be on the lookout for similar pieces to redo!
Donna says
I love the finished “trunk”. Wish I had the vision to see what things could be!
Marsha Heskett says
Girl~ your creativity knows no bounds!!! You’ve hit another home run with this one!! Luuuv it👏👏👏
Janet S says
Omgoodness! I liked the “before” but I love the “after!” It’s fantastic! You’re very creative!
Tonka says
I LOVE it! Great tips and resources!
Hopejw says
It has been a while since I’ve been inspired by anything or anyone. Until today, You knocked this one out of the park! You did an amazing, creative job on this piece! This is not the same ole same ole, white on white on white, hum drum piece;
#younaileditright
Gorgeous piece Jen! 🙏🏻❤️🙏🏻
April McBride says
Clever transformation & will blend with many decorative styles as well as stand out as a conversation piece all on its own! I absolutely love it!
Nicole says
I am absolutely in love with this piece!! Amazingly creative! What an outstanding job 😍
Nancy @ Artsy Chicks Rule says
Wow, super cool and creative makeover, Jen! I absolutely love this one! xoxo
Bobby says
I am new to your projects and absolutely love this. I am an avid estate sale junkie. We have so many wonderful ones near me. I have seen pieces like this before and now I will grab at one. You did so many cool things to the piece. Love the handles and hardware you added on top. Can’t wait to see your next project. Bobby
Becky says
Holy COW! You win!!! This one is AMAZING! I wasn’t seeing your vision until that “after” picture. Wow! One of the coolest furniture transformations ever!
Pat says
Wow! This is my favorite piece from you! Great job-so amazing!
Jerri says
I can understand why it’s one of your favorite pieces. It turned out awesome. You have a great vision for makeovers. And the talent to transform.
Lily Becerra says
So beautiful! I love how you layered the paint! Ty!!
Kym Kinnison says
Looks fabulous Jen !
Elina Baade says
It looks beautiful!!
Sue says
I’m always amazed at people’s imagination and creativity. This turned out gorgeous. It looks very old and rustic. I really like the pulls, nail heads and color. You did a fantastic job. Thanks for sharing.
Kaz says
That is a fantastic transformation.
Love it. Well done U 😊
Mary says
Now that’s what I call a transformation!!! End results are 100% AWESOMENESS!!!!❤️❤️❤️
Jen, Girl in the Garage says
Thank you so much Mary, I’m happy you like it!! ❤️
Jen, Girl in the Garage says
Thank you so much Kaz!!
Jen, Girl in the Garage says
Thank you Elina! 💖
Jen, Girl in the Garage says
Thank you so much, Kym! 😊
Marie-Interior Frugalista says
Wow Jen, what a fabulous transformation! I think this is one of my favorites of yours, and I have many!