
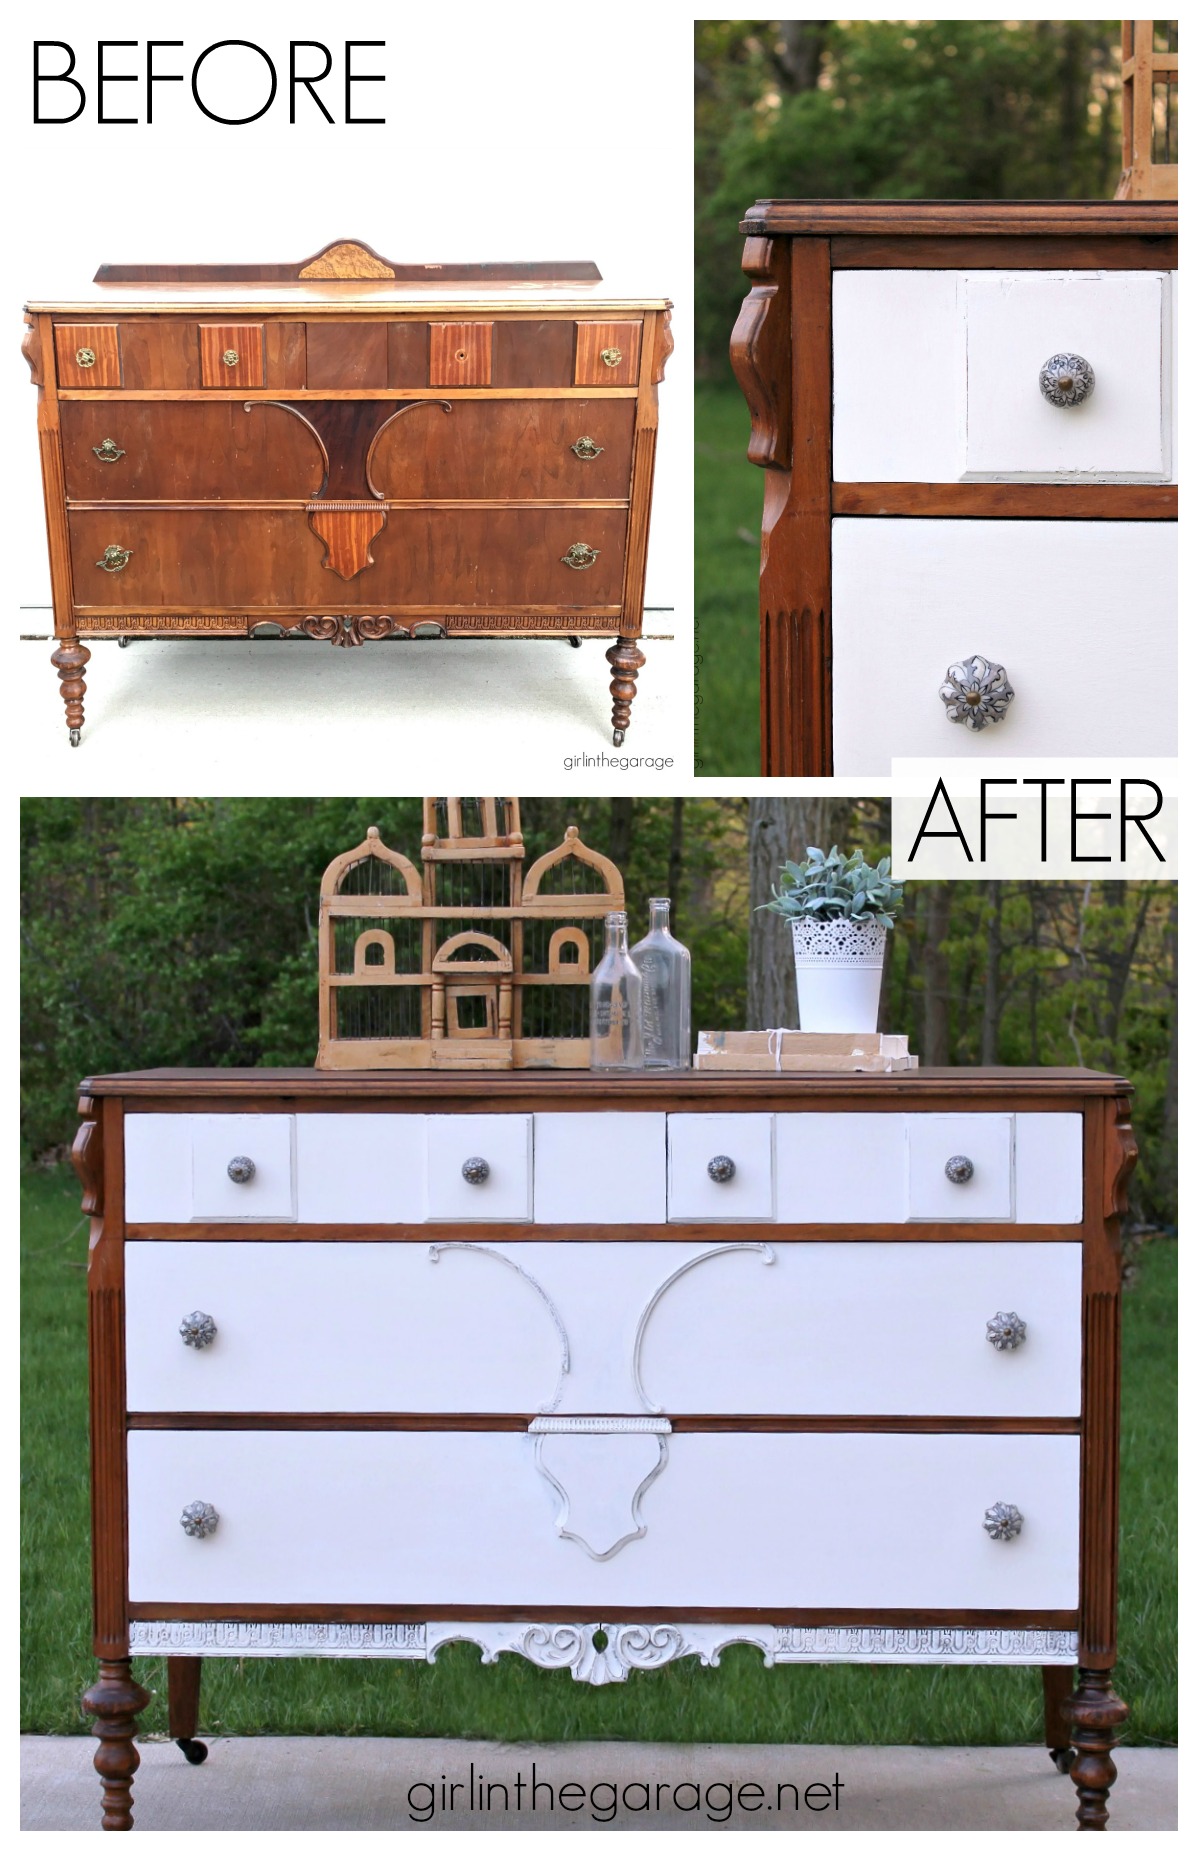
A local thrift store posted a photo of this antique dresser on their Facebook page, and you bet I drove over there immediately – wouldn’t you? 🙂 I brought my 2-year-old son along for the fun – thankfully I have a pretty big SUV.

It was on sale for about $60 I think. It was pretty scratched up and the veneer was chipping in some places, and there were a lot of different types of wood colors and patterns which seemed kind of odd/distracting to me.
It was the perfect candidate for a fresh new look! Today we’ll discuss how to paint and stain an antique dresser.

**Today is Furniture Fixer Uppers day with some of my blogging friends – see their creative furniture makeovers at the bottom of this post. Also, this post contains some affiliate links so you can easily find the products I use and recommend. Discover my favorite tools and brands for doing DIY projects here.
Here we are after getting the dresser loaded (it barely fit). Haha! My helper is such a cutie.

Prep the Antique Dresser
After getting home, we cleaned it up and Guy in the Garage helped by sanding the top smooth with our orbital sander. The wood was just gorgeous! (Ignore the strange tree branch shadow.)

The back of the dresser has a stamp that says “Walnut Veneer” – the wood color was so pretty and didn’t deserve to have the good areas painted over.
Stain the Antique Dresser Top
Minwax stain in Special Walnut was pretty much the perfect match. Hubby stained the top and then sealed it with matte polyurethane. We used matte because we didn’t want a really shiny finish.

Prime and Paint the Antique Dresser
Next up, the drawer fronts were sanded and the areas that were going to be painted were first primed with my favorite shellac primer.

(See priming before/after below…)

The drawers and the decorative parts of the body were painted with about 2 coats of Annie Sloan Chalk Paint in Old White and left to dry. Next they were sanded and lightly distressed, and then protected with clear wax applied with a lint free cloth. Tip: When distressing, lightly sand over the edges of details (edges, lines, curves) with 320-grit sandpaper to accentuate them more. See how it looks further below in the After photos.
Below, sections are taped off in preparation for painting.

Learn all about how to Chalk Paint furniture here – a beginner’s guide to Chalk Painting.
Finally, the remaining wood areas (the sides, legs, and between the drawers) were given a good wipe down with hemp oil applied with a lint free cloth. It helps revive dry wood and makes it look oh-so-pretty again.
Here’s how this painted and stained antique dresser looks now:
And here’s a closer look at that beautiful top with the new walnut stain:

And oh my goodness – how could I forget my favorite part? The new patterned knobs from Hobby Lobby. (All the heart eyes!) Truth be told, I bought them first and then planned the rest of the antique dresser makeover around them.

Does anyone else see the face below? Ha!

The details and trim really pop after being painted and sanded.

This is truly one of my new favorite pieces! I love it so much, but sadly we don’t have a place for it in our home. We took it to my booth at Antiques on Main (Crown Point, IN) last week. Update: It sold.

And because we’re goofballs, we totally forgot to put the backsplash back on for staged photos! So here it is in my booth with the painted backsplash attached.

Friend, I hope you’ve enjoyed this tutorial for how to paint and stain an antique dresser for beautiful results.
Feel free to share this post with a friend or Pin it to easily find this painted antique dresser project later:

As always, I’d love to know your thoughts. Please leave a comment below and pin/share this project so that others can be inspired too. Thank you, friend!
– Jen
Also, it’s Furniture Fixer Uppers day again, which means 5 more creative makeovers to inspire you.

Below are the Before photos – visit the links underneath to see the Afters and learn how they did it:
 1. Just the Woods
2. Prodigal Pieces
3. The Interior Frugalista
4. Petticoat Junktion
5. Confessions of a Serial DIYer


Larissa ~ Prodigal Pieces says
You have the cutest helper! I love it. Plus, you scored a gem and gave it a chic new look. Those details look amazing!
Christy says
Absolutely stunning, Jen!! And I do see the face ha ha…I did one once that looked like it had the face of a cat lol! XO
Margie says
Beautiful dresser! I see a flower urn. It would look so pretty with flowers and ivy spilling out of it. You do have an amazing way with decoupage. Just sayin’ what I see. It is pretty just the way it is.
Lena says
I love this makeover. I’m a big fan of the wood/paint combination.
Margie says
Beautiful dresser! I see a flower urn with beautiful flowers and ivy spilling out of it. You are so creative with decoupage. Just sayin’. Love your blog.
Marie says
Your little helper is adorable and looks like he was having fun with Mom! The makeover is gorgeous, Jen and I’m sure it’ll be gone in no time 🙂
m says
What a beautiful dresser. The wood looks so much better now!
kandice kullmann says
love the paint and stain combo! Your helper is adorable!
Carolyn says
Is there a reason you painted the bottom decorative strip? I think I may have left it the way it was originally. I do love the paint/stain combination look.
Cheryl Corlazzoli says
I love it. And I especially love your tutorial with pictures!!!
Debra A Wise says
Love the combination… it’s gorgeous! Your helper is so precious!!
Lizzy Leff says
Beautiful.
Linda Henry says
Ur very crafty and I like ur little helper.
Christie says
Oh Lord, I love it!! It’s now one of my favorites. Fantastic work!! I think I’d have kept it even if it had to sit in the middle of my living room floor!
Terrie says
I think I’m in love, it’s lovely. Also gave some ideas for my own projects thanks so much Jen
Stacy says
Stunning as usual!
Jen, Girl in the Garage says
Thank you so much, Terrie – I’m glad you like it!
Jen, Girl in the Garage says
Thanks so much, Stacy!
Jennifer says
What a beautiful piece of furniture and you did an amazing job bringing it back to life. Oh, how I wished it were mine!!!
Jen, Girl in the Garage says
Jennifer, that is so sweet – thank you!!
Kasia says
It looks fantastic! It’s amazing how a bit of paint can change a piece of unloved furniture into something special. P.S. I love the knobs. Thanks for sharing Jen!
Jen, Girl in the Garage says
Thanks so much Kasia!
Jill says
So pretty!
Could you explain a bit more how you dealt with the damaged veneer? I just bought a beautiful piece in need of rescue — but the top veneer is chipped and a tiny bit warped. Will a good sanding do the trick?
Jen, Girl in the Garage says
Thanks Jill! The veneer wasn’t too bad on this piece. A little bit of damage can usually be fixed with some sanding and/or wood filler. But if you’re planning to re-stain it, the wood filler areas may take the new stain differently than the rest. If there’s a lot of damage, then you may opt to remove the veneer altogether. Here are a couple more posts that might help: https://girlinthegarage.net/2017/09/molly-sideboard-makeover/ and https://girlinthegarage.net/2017/12/end-table-makeover-broken-foot/ – I actually use a different wood filler now though, I prefer Elmer’s ProBond wood filler (in a little tub). Hope that helps – good luck!