
DIY Tutorial for How to Stencil Bone Inlay Furniture
aka How to Save Yourself Thousands of Dollars by Getting the High End Look for Less
Friend, this is one of those pieces that you find on FB Marketplace, go to the kinda creepy house, things seem a little off, get the furniture loaded, then hurry your butt outta there and call your mama while you’re driving away to let her know you made it out alive. (Or am I the only one who does that?)
I try not to go anywhere alone to get furniture, but if I do I always tell my husband or mom the address and details of wherever I’m going… and I stay away from Craigslist anymore. You just never know!

P.S. I also made you a short helpful video of this stenciled sideboard makeover – look for it in this post.
The shape and style of this sideboard were just too charming to pass up. There’s no maker’s mark but it’s definitely well built, and someone took care to protect the drawers…

and even the back side. LOL. I’m not sure who would put contact paper on the back of a sideboard?
Learn how to remove contact paper the easy way here.

**This post contains some affiliate links so you can easily find the products I use and recommend. Discover all my favorite brands and tools for doing DIY projects Here.
The top had some water rings and small scratches, so Guy in the Garage helped out and sanded it down for me with our inexpensive yet handy orbital sander. As a reminder, please wear safety protection and follow directions when using any power tools.
Learn more about all the steps for prepping furniture like a pro Here.

With the top sanded down, I was smitten with the beauty of the woodgrain (maple I think) and decided that I couldn’t just cover it all up with paint.
So I decided to…….. Stencil right over the gorgeous bare wood. <3 A stenciled table top can be charming and unexpected!

Bone inlay furniture is incredibly gorgeous but also verrrry expensive. This is the perfect way to get the same look for much less dinero.
How to Stencil Bone Inlay Furniture – Stenciled Table Top Tutorial
First, get a good quality Indian Inlay stencil like this one I used. Here are some more pretty options. I also used this same stencil about four years ago on this nightstand makeover (I like this new project better though – you live and learn).
Also, a tape measure will be your BFF in this furniture makeover so you can always stay symmetrical.

This stencil kit comes with five different designs. Lay them out to decide what should go where. Start with the stencil centered in the middle and tape it with painter’s tape.
For this project I used Country Chic Paint in Simplicity, which is a really nice crisp white, and I used this 6-pack of my favorite foam pouncers for stenciling.
Whenever you’re stenciling furniture, lightly dab the pouncer into the paint and then blot it onto a folded paper towel nearby. You want very little paint on the pouncer to avoid smudges when you stencil.

Pay special attention to the corners – when you’re getting close, stop and decide if you need to end a section early or scoot it over a little to make the ends meet nicely. You might have to improvise to get the design centered near a corner or on a shorter edge of the stenciled area.

Also, since you’re reusing the same stencil piece over and over in this type of furniture makeover, you might want to take a break to wash and dry it before continuing. Too much paint buildup can cause the pattern edges to not look crisp.

I stenciled the middle area with the Indian Inlay stencil and then made a border around the edges. That was easier for me to see what I still had room for in that open space, and thankfully the small and large floral pieces fit perfectly on the stenciled table top.

Finally I added a little stencil around the side edges of the table top.

For the body of the sideboard, first I primed it with a few coats of shellac primer to help avoid bleed through. (That stuff is really stinky when you’re using it, so apply it outside or in a well-ventilated area.)

The body was also painted in Simplicity by Country Chic Paint, and no topcoat is required with their paint unless it’s a high traffic area.

I couldn’t be happier with how this piece turned out. It has so much more charm now with the beautifully stenciled table top.

I love how this stencil kit can completely transform a plain piece of furniture into a high-end piece for thousands of dollars less than buying real bone inlay furniture – and no bones required (thank goodness).

Here’s a better view of the top:
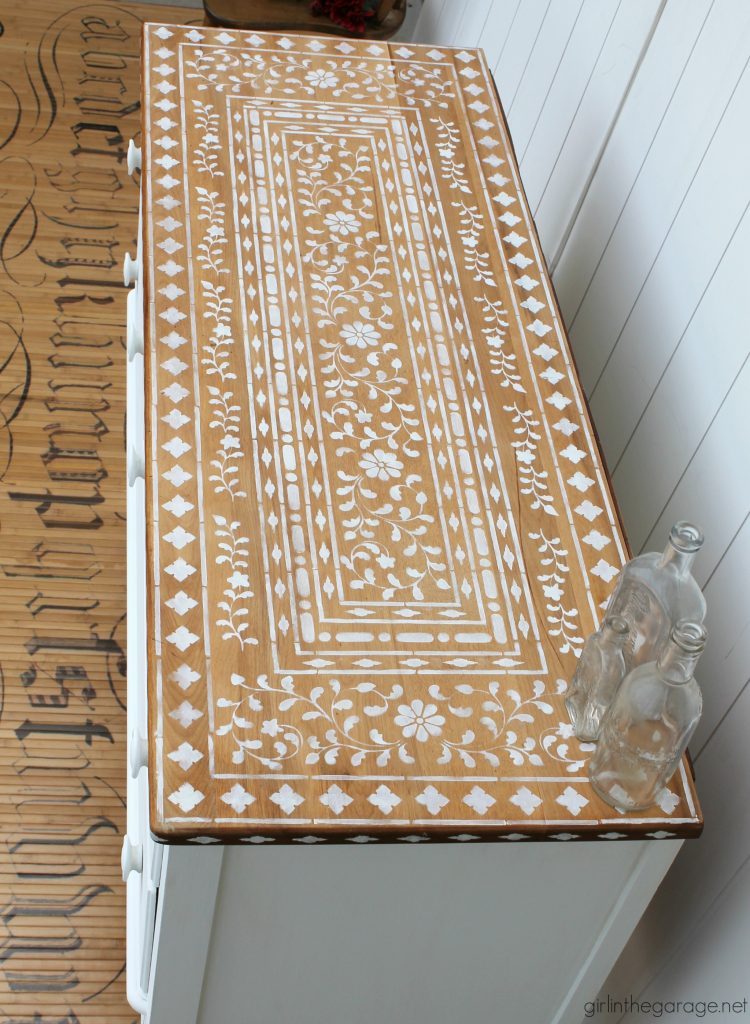
My heart skips a beat just looking at it!


How to Stencil Bone Inlay Furniture Tutorial –
Here are a few photo options to pin this project for easy access later:


Let me know your thoughts – have you tried to stencil bone inlay furniture before? Wow, it definitely takes some planning and patience, but a stenciled table top is so worth it. Please leave a comment below – I appreciate you guys so much!! xo Jen
Also – click here to read: How to Remove Contact Paper the Easy Way

Now it’s time again for Furniture Fixer Uppers day with my creative furniture makeover friends:
![]()
Below are the Before photos – visit the links underneath to see the amazing Afters and to learn how they did it:
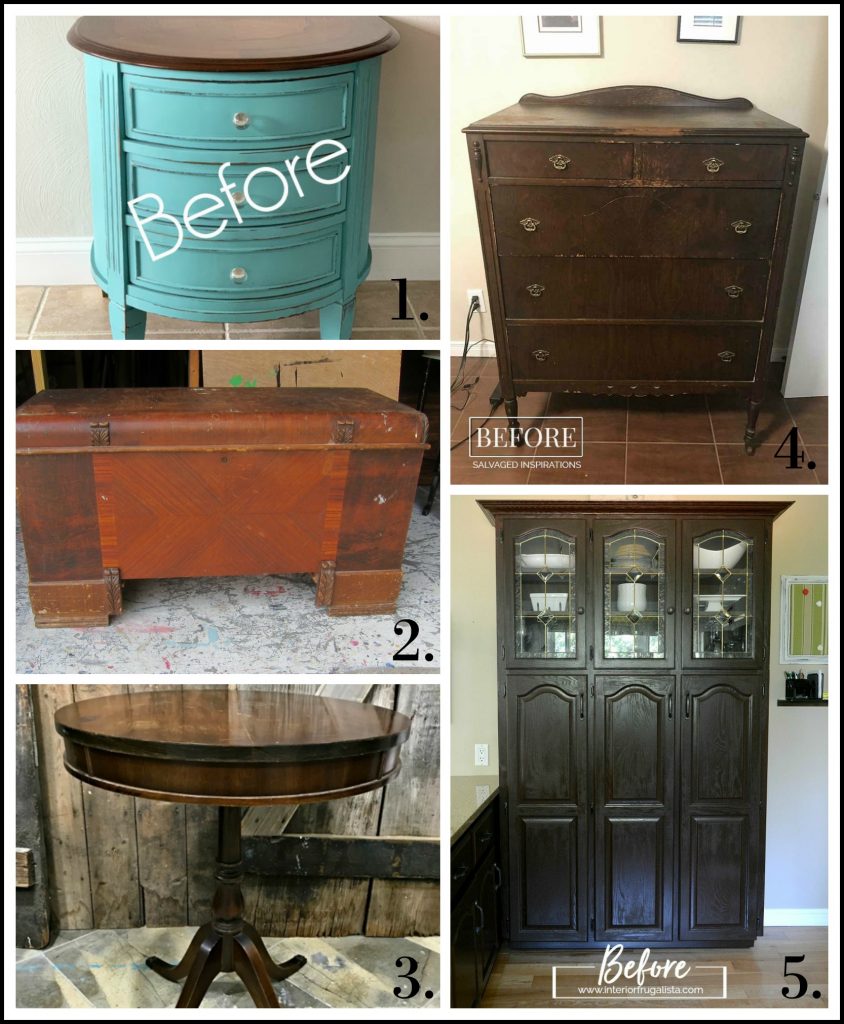 1. Confessions of a Serial DIYer
2. Petticoat Junktion
3. Just the Woods
4. Salvaged Inspirations
5. The Interior Frugalista
If you really love furniture makeovers and want even more ideas and inspiration, my new book Amazing Furniture Makeovers: Easy DIY Projects to Transform Thrifted Finds into Beautiful Custom Pieces is just what you need. Learn more and read 300+ satisfied reviews Here. Also here’s a peek at a few of the projects:


Christy James says
This is absolutely stunning, Jen!! I LOVE that you stenciled right over the bare wood on top! XOXO
Denise - Salvaged Inspirations says
Love this bone inlay makeover Jen! I have one of these inlay stencils in my stash somewhere…you’ve inspired me to hunt it down! ?Pinned!
Cheryl Atkinson says
Hi Jen! What a very cool transformation. I love the look.
Shirley says
I must have a strong Scandinavian side to me because every time I see something from Denmark, Norway, Sweden, etc. I just go crazy over it and I am crazy in love with this makeover! It reminds me of things past that family had in their homes but I’ve only seen these things in pictures. I just sent in my DNA test so we shall see! Again, I am madly deeply in love with this! Nice work!
Marie says
Wow, this is an absolutely stunning makeover, Jen! No wonder your heart skips a beat when you look at it. I had to laugh at your opening paragraph – so glad I’m not the only one.
Kandice kullmann says
This is so pretty. That stencil is perfect!
Mimi Denman says
Beautiful and very creative. I was also thinking that using pearlescent paint and several layers of varnish might make it look even more like the real thing…
Paula Pentoney says
Wow! That is gorgeous! You have great taste and vision for your pieces. I wouldn’t be able to keep my eyes off of it if I were you. ?
Naomi S says
Jen, you did a fabulous job on this! I especially like that you left the bare wood on the top of the piece.
I don’t know if I would ever attempt such a big stenciling job. I have only done two tiny, little stenciling projects, the last one recently, and I had a very frustrating time getting the edges clean. This last attempt I was stenciling just four small letters on a plant holder and I had to do each of them over two or three times to get the edges sharp. I was using a foam pouncer because that is all I had and I tho’t I was using very little paint on the pouncer, but I just kept getting messy edges. I had read somewhere that you should use a stenciling brush, but I didn’t have one so I tho’t maybe that was my problem until I read this post where you used the foam pouncer with beautiful results.
Anyway, I am going to order some of the pouncers you recommended and keep trying. Because I really love the look of stenciling. But I know I will have to practice A LOT to be able to do what you did with that sideboard! SO pretty and perfect!
Hope J says
Holy moly, you have the patience of a saint! It turned out stunning!
Me,……..not so much! lol
Rose Lefebvre says
I LOVE, LOVE, LOVE this piece! Wish it were mine! I also love the can on top that says ROSE Brand on it as that is my name!!
Melodie Brymer says
Love this! I want to use this exact stencil on a cedar chest I have, but I plan on using a white paint that looks like pearl for the inlay. Maybe I can find time this fall.
Enjoy looking at your projects.
Susan Homeroad Stevenson says
This is fabulous! I love the gorgeous top of this beauty!
Deb says
Absolutely Stunning!!!
Lynn Bauer says
Jen, love it, love it, love it! But of course, I also love the rug it’s sitting on. Any suggestions on how to make one of those??? Thanks for such beautiful, creative, inspiring ideas…… Lynn
Gwen says
this looks great, light and airy! when i think of Indian Inlay, i think dark colors, but i like this one!
Jen, Girl in the Garage says
Thank you Lynn! The bamboo rug is from Decor Steals… they offer different deals every day and once in a while this rug is offered again. (It comes in different sizes, this one is 10×7) 🙂
Jen, Girl in the Garage says
Thank you so much Deb!!
Jen, Girl in the Garage says
Thank you Susan! I’m so glad I didn’t paint the entire top. xo
Jen, Girl in the Garage says
Thanks so much Gwen! 🙂
Jen, Girl in the Garage says
Thank you Melodie! If you stencil the chest please send me photos! 🙂
Jen, Girl in the Garage says
Thank you so much Rose! 🙂
Jen, Girl in the Garage says
Thank you so much Naomi! I actually do have a stencil brush that I used once or twice, but it didn’t make much of a difference in my opinion. I like how these pouncers are short so my hand is closer to the furniture, and I feel like I have more control over it. You can also try a temporary spray adhesive on the back of the stencil – but I’ve only used that on fabric, not painted furniture. You’d probably want to try a test area first just in case. And remember to always use way less paint than you think you need – you can always go over it again to add more if needed. (It took me a lot of practice when I started too.) I hope that helps, good luck with your stenciling! 🙂
Jen, Girl in the Garage says
Thank you so much Paula!!
Jen, Girl in the Garage says
Yes, great idea Mimi. I attempted that with the very first stenciled bone inlay project I did years ago, but the paint wasn’t as pearlescent as I’d hoped. It would be very pretty though!
Jen, Girl in the Garage says
Thank you Marie! Haha yes… glad I’m not alone. 🙂
Jen, Girl in the Garage says
Thank you so much Shirley – I love Scandinavian style too! 🙂
Jen, Girl in the Garage says
Thanks so much Cheryl!
Jen, Girl in the Garage says
Thank you Denise! xo
Jen, Girl in the Garage says
Thanks Christy! I’m happy the bare wood was in good condition on top! 🙂
Just Justin says
Stunning!
My aunt would paint or wallpaper or contact paper the back of furniture because she was always rearranging the furniture in her house and would sometimes put a piece in the middle to divide up a space and since the back wasn’t meant to be seen she would “pretty it up.” 🙂
Jen, Girl in the Garage says
Ooh yes that makes sense! Thanks Justin 🙂
Cathy says
Hi Jen,
Love the bone stenciling on the sideboard!!
I love your comment about a creepy home and if you are going alone to be sure to tell someone where you are going. About 15 years ago I went on a business trip with my husband to Houston (from Seattle). While he was working, I decided to go antiquing. I did tell my husband what I was going to do but really had no idea exactly where. I found a list of places and I headed out. One of the places was in a very old, well-kept brick home in a not so nice-looking neighborhood. The house was on a corner and the lot was up on a hill. There were no cars parked around the house, which I thought odd. I also thought maybe I should just leave now….but the house was really cool looking and I love old homes. From looking at the house I guessed it had 3 floors and a basement. I climbed the stairs and tried the door, it was locked, (again, I think it is strange the door is locked and maybe I should leave) I knocked, and no one appeared. I knocked again and as I was about to leave the door was opened by a man, dressed in Docker type slacks and a white shirt. I asked if this was an antique store and he said it was and to come in. Then he opened the door of an old armoire and said I had to leave my purse there. OK, I was nervous that the door was relocked when I entered and wondered why I had to leave my purse behind. He stated that they had had problems with people taking small items and that the purse might drop off my shoulder and break something. Of course, I am thinking there is someone else there and they might just steal what cash I had. So, he ushers me in to the parlor and then the living room. The place was full of tables holding wonderful antiques. The rooms were divided by very grand (original finish) walnut sliding pocket doors. I was in awe of the house. I picked up a serving dish that was gorgeous but choked at the $200 price. The man proceeded to tell me the history of the serving piece. Interesting but it was not in my budget. I kept listening to see if I heard any noises coming from where my purse had been left, nothing.. We continued to make small talk as we walked around the first floor. He told me the history of the home and who build it but, I was still on my guard!! He said they had more upstairs and would I like to go up there. I said yes and it was mostly furniture. Then he informed me that he also lived in this home, and showed me his personal bedroom. CREEPY!! The third floor was off limits to shoppers. We came back down to the first floor and he told me the basement was also full of antiques and would I like to go check it out. Now, I am really wondering what the heck am I going down the rickety stairs into a darkish basement with small narrow and up high windows. I am looking around for exit doors in case I need to run. There were strange and unusual items down there, but the prices were much more within my budget. Then he opens a large, wood and metal door and tells me it is the workshop where repairs are made and motions for me to step inside. He turned on a light and I could see that it indeed appeared to be a windowless work room. No, I did not go inside as my imagination was going crazy thinking if I went inside, he could slam the door shut and who would ever find me or even know where to look. I looked left and right for something I could use as a weapon, or to block the door if needed. Feeling guilty about not finding anything affordable on the first or second floor, I found a small item to purchase. When I retrieved my purse from the armoire, I noticed the strap was in the same position as I had left it. When I opened my purse, it appeared nothing was amiss. I paid for my item and could not get out of there fast enough. Of course, once out of there I thought of all my spidey senses that were going off and why didn’t I just walk away. Really dumb!! Since then I have never done anything like that again!!
Janie Melcher says
This is really beautiful and creative. Thank you for sharing.
Jen, Girl in the Garage says
Oh my goodness, I’m so glad you made it out of there safely!