
With thrift store prices higher along with everything else, I really have to keep my eyes open for good deals. For today’s thrifty project, I found this old piece for $30 – not great, but not terrible either. Today I’ll show you how to paint a bookcase and then stencil it with multiple colors (using Country Chic Paints this time).

This post contains some affiliate links so you can easily find the products I use and recommend. Discover all my favorite brands and tools for doing DIY makeovers here.
First, I wiped the piece down to clean it. Next I got a flathead screwdriver and carefully started prying the back away – I planned to reuse it, so I didn’t want any damage. It’s much easier to paint a bookcase and add a fun design to the back when that panel is taken off. Also remove any nails and set them aside to reuse if they’re still in good condition.

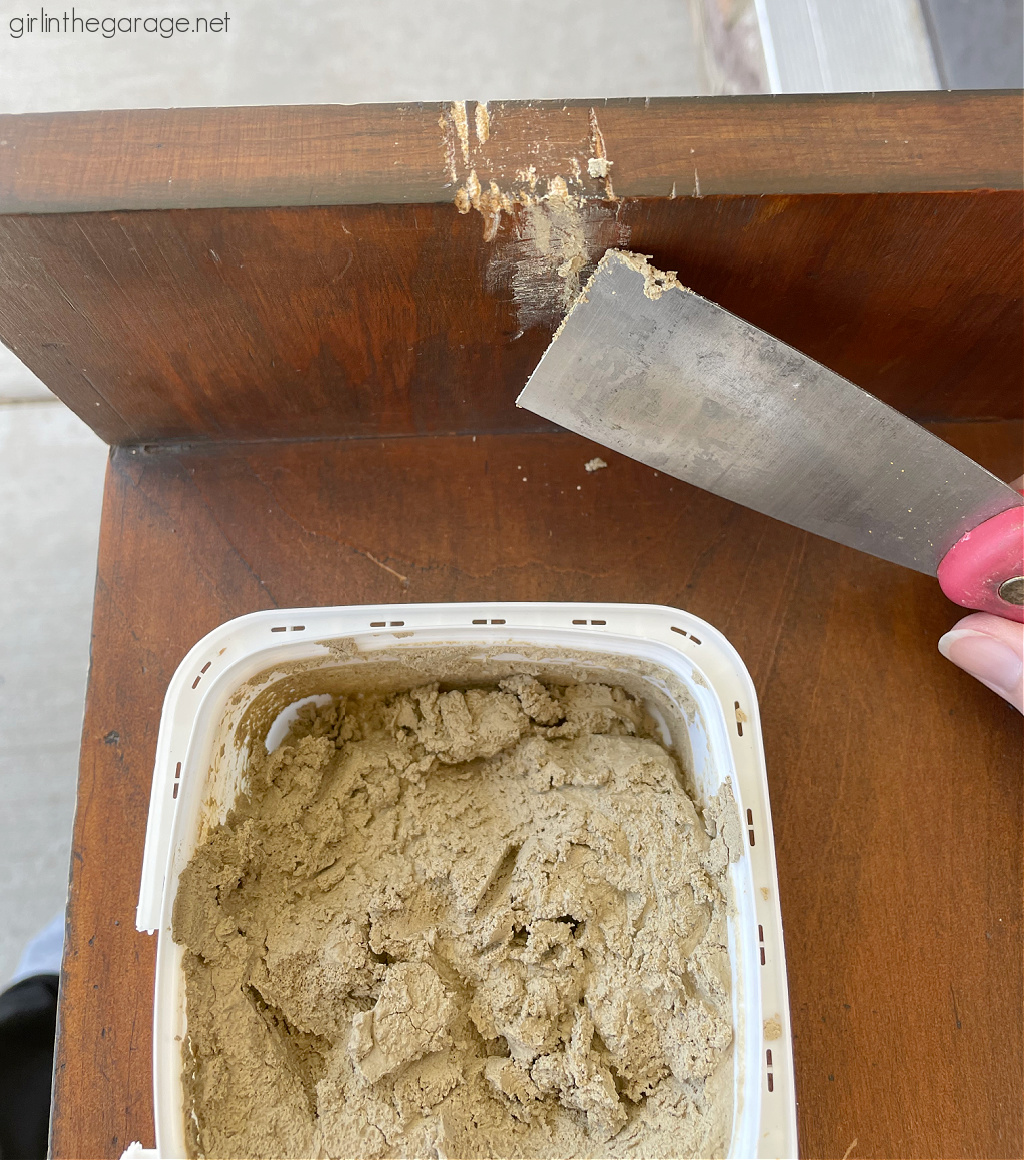
The little cracks and crevices were filled with wood filler. After drying, I lightly sanded the filler and the rest of the bookcase for smoothness.
Next, I was concerned that this dark stained and knotted wood would bleed through, so I applied two coats of my favorite primer. This stuff stops ugly pink/yellow undertones from seeping through under white paint and also blocks any lingering odors. And yes, you often need to use primer first even if the paint claims to be “no prep.” Grab my free printable guide here to learn all the steps to properly prep furniture for painting.

Here is the bookshelf all primed and ready for paint!

I decided to use Country Chic Paint on this painted wood bookcase project. I’ve used it in the past and liked it, and wanted to try several colors for my stencil idea, so I popped over to Amazon and picked colors that reminded me of nature. (I bought them myself, CCP did not sponsor this post.)
There are 50 different Country Chic Paint colors to try. I used:
- Simplicity (white)
- Bee’s Knees (soft yellow)
- Hollow Hill (dark green)
- Ooh La La (pink)
- Road Trip (tannish yellow)
- Soiree (tannish gray) – not shown below

I painted the bookcase and the back panel in two coats of Simplicity using one of my favorite Purdy paint brushes.
Next I pulled out the gorgeous Forest Pattern Wall Stencil that was sent to me by the folks at Stencil Revolution. I love this stencil because it’s whimsical and I knew I could have some creative fun by using multiple paint colors to make the pattern really pop.

I centered the stencil on the back panel and secured it with delicate painter’s tape.
Then I got my Country Chic Paints ready and pulled out all my stencil brushes and pouncers. The most frequent part of the pattern was the greenery, so I started with the green paint. Remember to dab off the excess paint and only apply a little to the stencil to avoid smudges.

I matched the rest of the animals and plants with the paint colors and went carefully, double checking to make sure I didn’t skip any areas.

Each area got two light coats of paint. You can see below how I taped off the top of the back panel because I wanted that to stay white.

Finally, I went over several areas with an artist’s brush to fix any details. I also had to embellish about an inch on each side since the stencil was just a little too narrow.

Painting the back of a bookcase is much easier when you remove it first, especially if you want to add a beautiful stencil. I’ve also decoupaged the back of a bookcase with napkins before – you can see that project here.
When the paint was dry, I reattached the back panel.

And here’s a final look at this painted wood bookcase with whimsical forest pattern:

I think the Country Chic Paint colors really help this stencil pop in a fun way!

Country Chic Paints are matte, chalk-style paints for furniture and decor. I love that there are so many colors to choose from and the price is reasonable.
And I was also impressed with the quality of this Forest Pattern Wall Stencil from Stencil Revolution. It’s large and definitely less expensive than some other popular brands for a wall stencil. I actually prefer to use wall stencils on furniture because that’s less that you have to move the stencil and readjust it.
Learn more about Country Chic Paints here and the Forest stencil here (plus if you have Amazon Prime, you can get them with free fast shipping).

Another closeup – so pretty.

Please feel free to share this project with a friend or Pin it to easily find it again later.


I’d love to know what you think of this tutorial for how to paint a bookcase and stencil the back with multiple Country Chic Paint colors. Please leave a comment below. I read them all!
Now here are some more makeovers from my sweet blogging friends. Below are the Before photos – visit the links underneath to see the creative Afters and to learn how they did it:
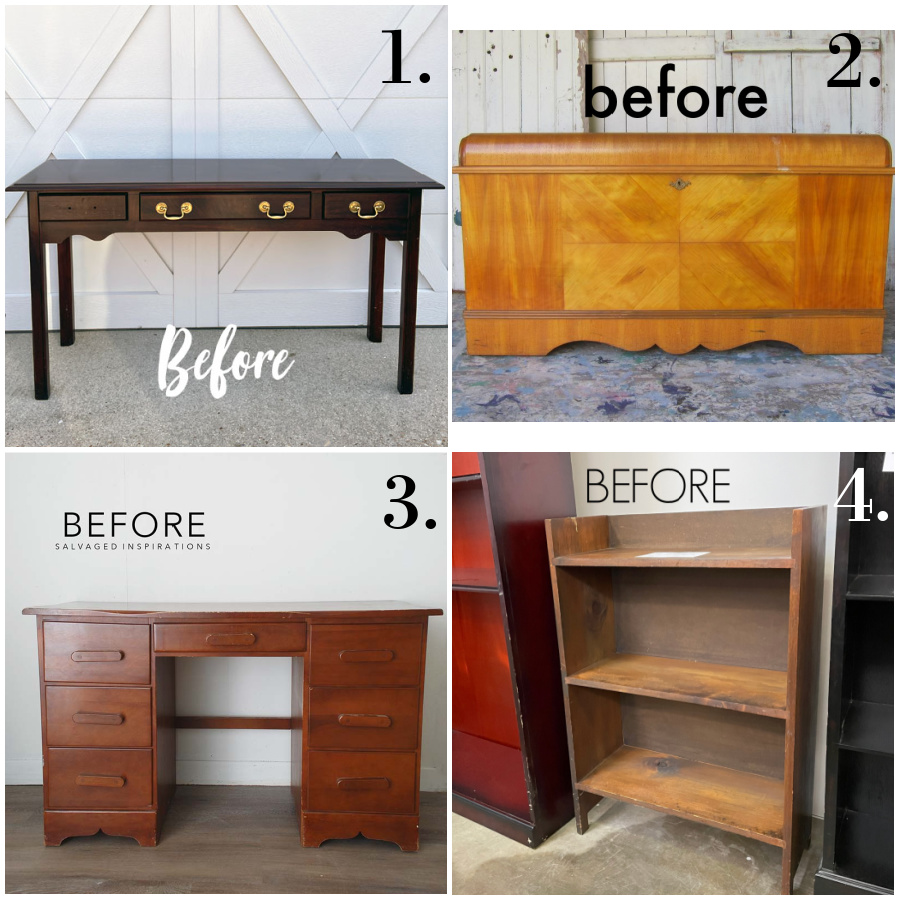 1. Confessions of a Serial DIYer
2. Petticoat Junktion
3. Salvaged Inspirations
4. Girl in the Garage (you’re already here)


Susan says
Brilliant and love the color choices for this stencil! Thanks for sharing
Cheryl Atkinson says
Hi Jen! I love this stencil. I’m a huge fan of Country Chic. The bookcase now looks bright and fresh.
Heather says
Oh my goodness!!!! That is soooo cute!!
Karen says
Great job Jen! Definitely better than the original and so whimsical.
Denise - Salvaged Inspirations says
This is adorable and that stencil with the colors you chose…perfect choice Jen! Pinned! Have a super day my friend. XOXO
gwen says
THIS IS SO CUTE! GREAT IDEA TO USE A LARGE WALL STENCIL FOR A PROJECT LIKE THIS! I’LL HAVE TO CHECK OUT THAT COMPANY – THANKS FOR THE TIP JEN!
Niki says
This is such a good spring time project. I like the colors you chose for this whimsical stencil. Very fun ! Great job Jen!!
p says
Soooo cute. You picked great colors for this stencil.
You created such a fun cheery piece. 🙂
Thanks for sharing.
p
Christy James says
It is unrecognizable now! The stencil is just so cute!! XOXO
Barb says
Country Chic paint is the only one I use for furniture. It never fails me. Small projects get Folk Art Chalk Paint. The bookshelf is lovely and the colours really work.
Kelly Ellison says
This is definitely one of my favorites. Absolutely adorable! I’m looking into those wall stencils right now!!
Kathy says
I love it!!! What a HUGE transformation!! I also love my gift you sent as well 😊 It will come in handy for sure! You’re so talented and inspirational. Thanks so much!
Debbie says
Wow! Great looking. I love the stencil and your choice of colors! Can’t wait to do something similar. Thanks for sharing and inspiration!
Jen, Girl in the Garage says
Yeay!!! I’m so happy for you Kathy – and thank you! 🙂
Jen, Girl in the Garage says
Thanks so much for your sweet compliment, Kelly!
Mary says
Beautiful!! I may have to try something like this! Can you tell me what brand of stencil brushes and pounders you used. Stencils have always been difficult for me so I’d like to try some different equipment!
Jen, Girl in the Garage says
Thanks Mary! I think I linked some above, but in case I didn’t… my favorites are the small package of Martha Stewart pouncers, but I’m not sure if those are still available. I think there are some similar ones still on Amazon. I also have a stencil brush that a company sent to me that works well. I have collected an assortment of pouncers and brushes over time. 🙂
Jen, Girl in the Garage says
Thank you so much Debbie! Please let me know if you try a similar project! 🙂