
Friends, I’m taking a little break from blogging for some R&R.
I have some awesome friends filling in for me while I’m gone though so be sure to make them feel welcome! Thanks so much, and I’ll see you all soon!
Hi all! My name is Tara and I blog at Suburble – the land of the Sarcastic Suburban Housewife. With a staple gun. And two children clinging to her legs.
I’m so thrilled to be visiting Girl In The Garage today! Jen is such a sweetheart for having me here. The project I’m sharing today was a major coup in my DIY history. It’s the no-sew recovering of my formerly hideous leather ottoman.
And when I say “hideous,” I mean…. it looked like it had a disease. The incurable type.
The “before” picture of this ottoman ain’t pretty. It was purchased about seven years ago from a fairly decent furniture store. This means that we paid far more for it than we would now – mostly because we have children. When we bought this piece, we were ensured by the staff that it was genuine leather.
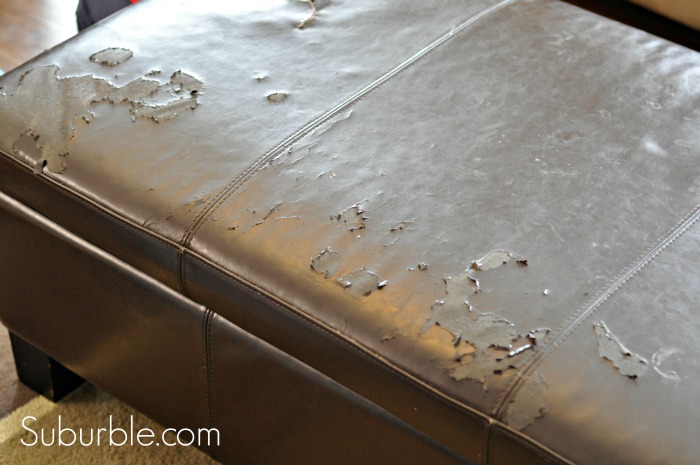
Genuine BONDED leather. Sigh.

The leather peeled up from its backing in a horrendously ugly fashion. It looked like my ottoman had a very contagious skin disease. (Quick Suburble tip here: we’re pretty sure that it was the use of baby wipes on the surface that destroyed the leather. Don’t wipe things off of your leather surfaces with baby wipes. Heed my warning!)
Mr. Suburble could barely stand the sight of our peeling and horrifying ottoman – and this became especially apparent when we had guests over. “Can’t we just get rid of it? Can you go out and buy a new one…. like… before dinner tonight?”
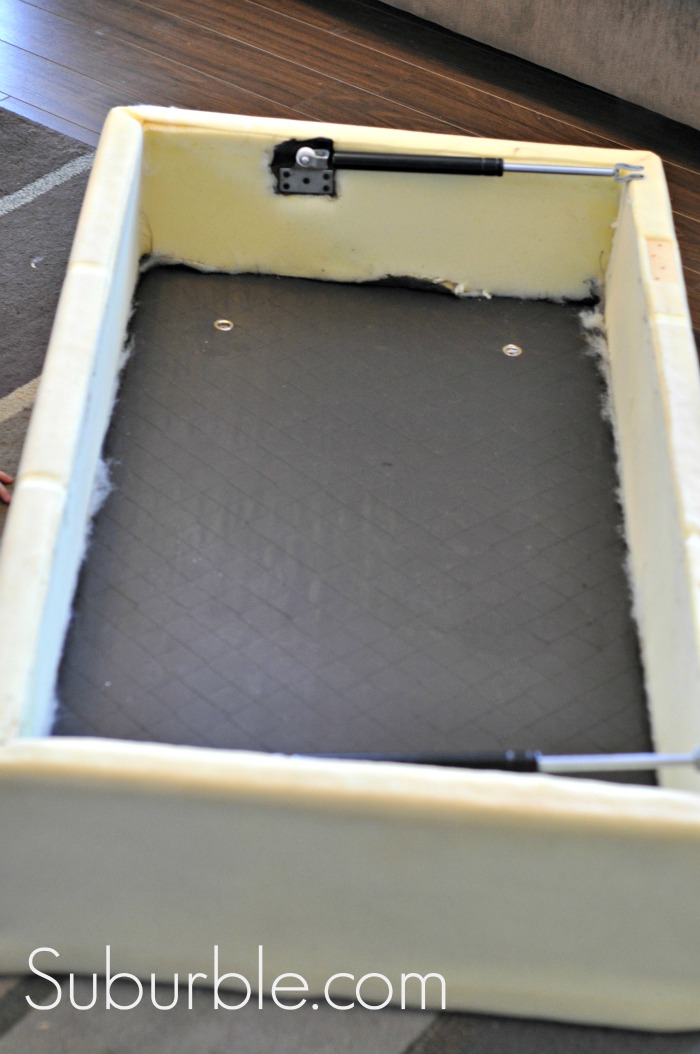
No! I can’t! My inner hoarder won’t let me throw away an ottoman that we paid hundreds upon hundreds of dollars for. The frame was sturdy, the closing mechanism still working – it was storage, for pete’s sake! In a house with no storage!
So I decided to save my ottoman. I was going to make him beautiful.
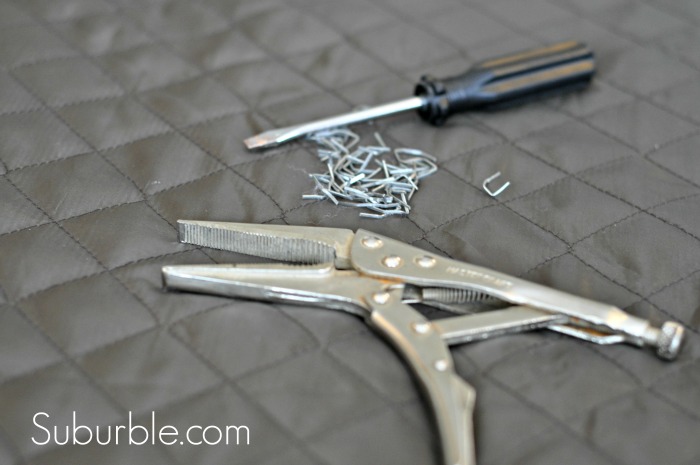
I gathered my tools. Using pliers and a flat-headed screwdriver, I plucked out all of the staples from the lining of the ottoman. It was perfectly good – no reason not to save it.
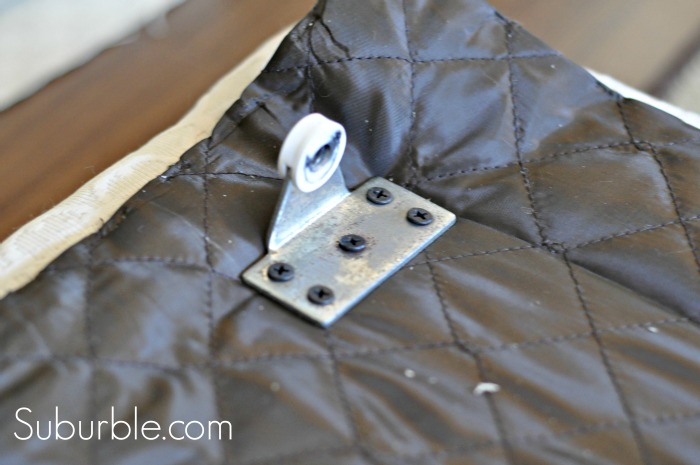
Lazy Ottoman Recovering Tip #1: If there is hardware attached to the lining, do not remove it.
Instead, leave it as a guide for re-attaching the lining later. Just remove the staples that are at the edges of the lining, and then move it to the side (or gather it in the middle of the frame) when you attach the new fabric.
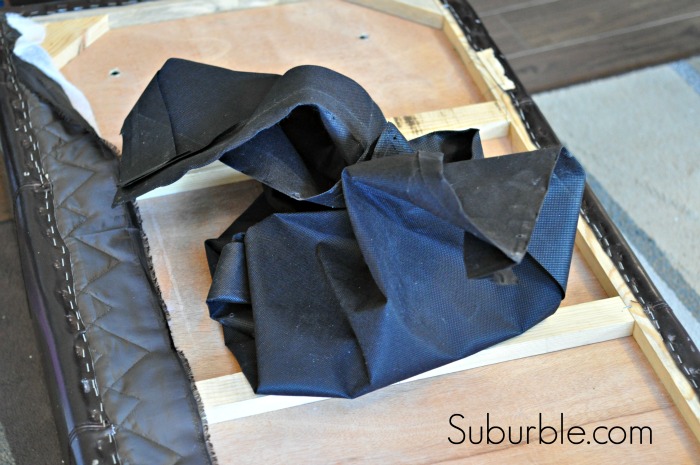
On the bottom of the ottoman, there were two staples that attached the liner to the middle of the box. I left those attached as well, so that I didn’t have to guess where the liner should be placed over the new fabric. Instead, I just bundled it up in the middle of the box and got to work on the leather.
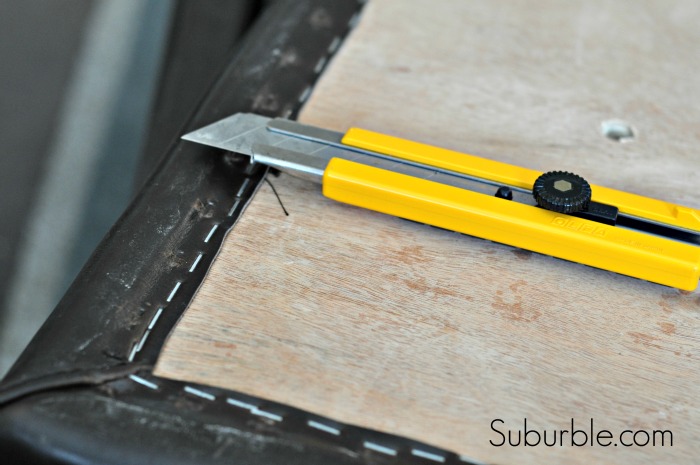
Using my handy-dandy scary-sharp box cutter, I cut off all of the leather from the ottoman. It was very daunting making the first cut. There was no going back now.
This was the part where I started to panic a bit. And I also regretted doing this by myself in the middle of the day with only my children as my encouragement. They mostly tried to play dolls within a three foot radius of me, or they asked incessant questions, “Why are you cutting the ottoman, mommy?” “Ohh… are you doing to tell Daddy that you did that?” “That’s really ugly NOW…”
Remember how I mentioned that I have children and that their baby wipes managed to destroy my ottoman? And did you know that overall, children are pretty messy – quite possibly the slobbiest of all – humans? Well yeah… I must have had some sort of failure in common sense when I was standing in the aisles of fabric in Joann (with my children running around me like wild jungle cats, I’ll have you know) – because I grabbed a bolt of cream coloured fabric and confidently headed to the cutting table.
Screw it. I like this fabric. I can’t deny myself this simply because I procreated.
Stupidity: I have it sometimes.
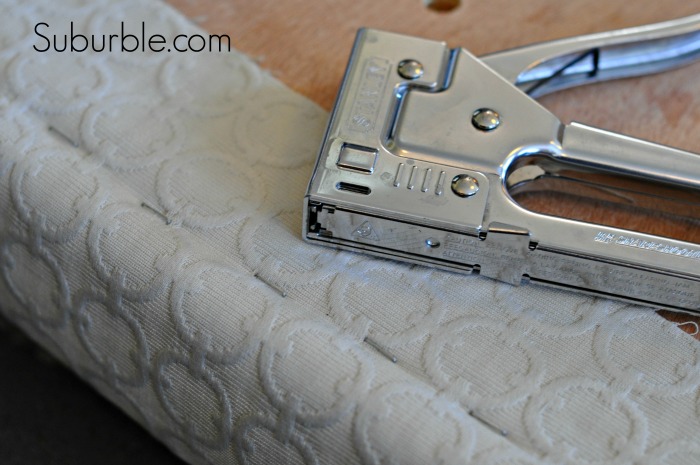
Anyways… I saved the foam from the frame of my ottoman so I just had to stretch the fabric over the lid and body and staple it down. Using a fabric with a pattern was helpful in this case, as I could use it as a guideline for stretching and stapling.
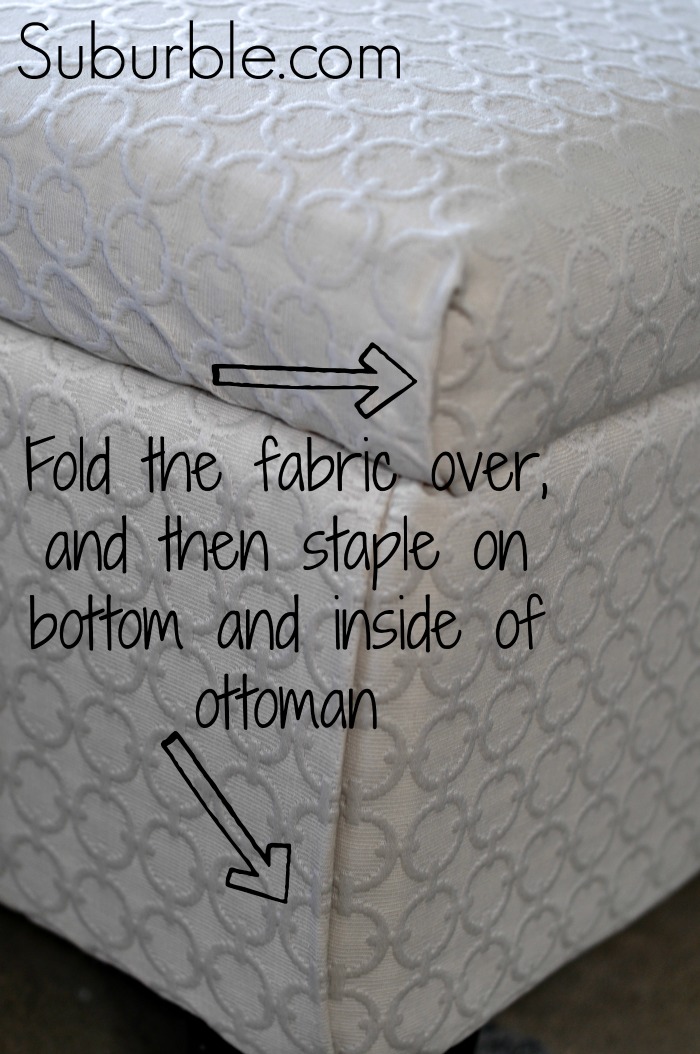
Lazy Ottoman Recovering Tip #2: Don’t sew the seams.
The original leather on the ottoman was stitched on the corners. And that looked nice. But it didn’t look easy – and this mama likes the easy way to do stuff.
So, I created my “no-sew ulphostery corner”. I cut the fabric into lengths that were about six inches longer than the fabric frame. Then, I folded the fabric onto itself and stapled it into the frame. Honestly, it took about a minute to do, and the end product looks pretty tidy! I deftly avoided a “sobbing over the sewing machine” moment!
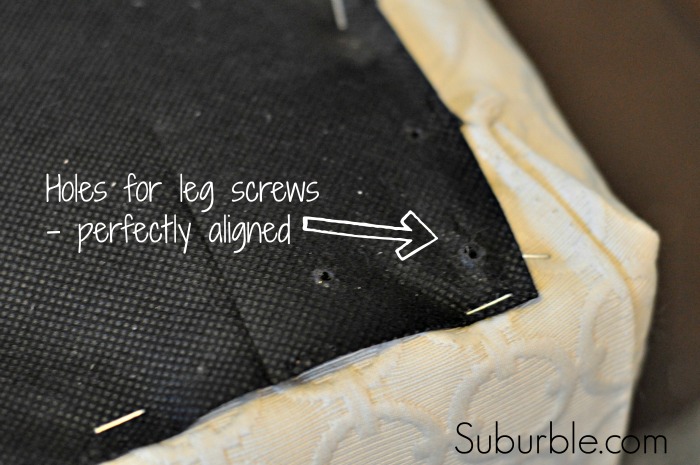
Lazy Ottoman Recovering Tip #3: Use the holes in the liner as your guide.
Once the fabric had been stapled to the frame, I then un-crumpled the liner (which was still attached to the frame in its center) and aligned it to where it should be. This was VERY helpful, as the liner already had holes for the ottoman legs, hinges, and closing mechanism for the lid. My new fabric didn’t do a good job of showing where those holes were (of course, as it covered all of the pre-drilled holes), so the liner was my guideline. I simply had to screw everything back into where the liner told me to, and it was a cinch!
(Granted, by now I was a sweating mess – having wrestled fabric over a hulking ottoman while two children practically pressed their faces against mine: “What are you doing, Mommy? Why? Whyyyyy…..?”)

The liner also helps to make the upholstering job look more professional. It adds a finished look to the piece.
(Do you see the legs of a LaLaLoopsy in this picture? Look closely… CinderSlippers’ glass shoe is hiding somewhere! Told you they were playing dolls practically on top of my project.)

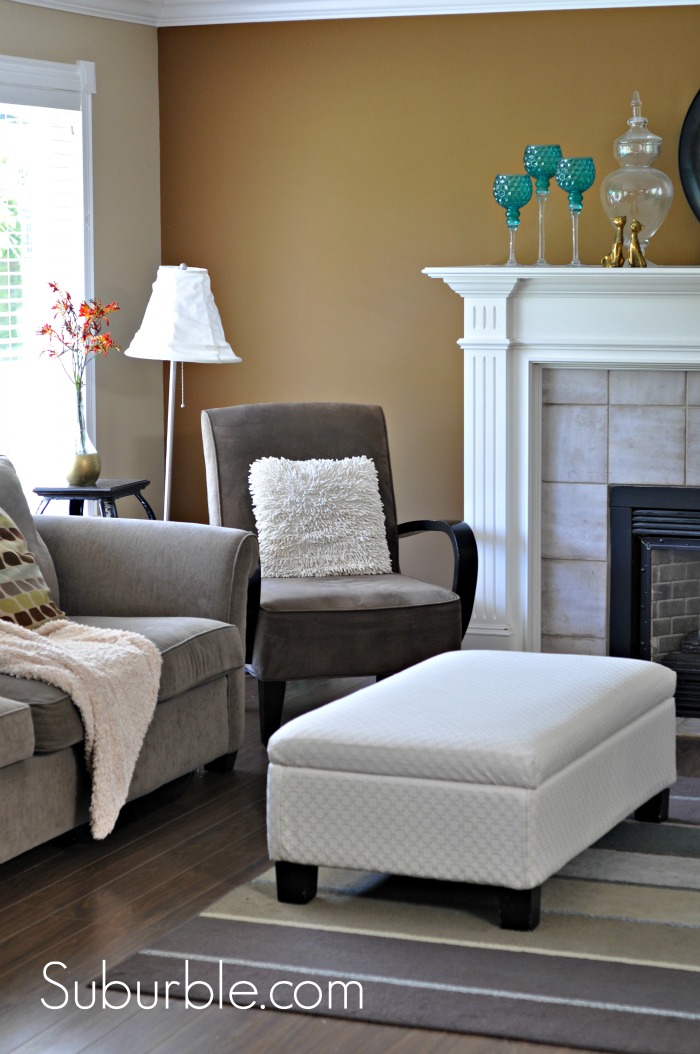
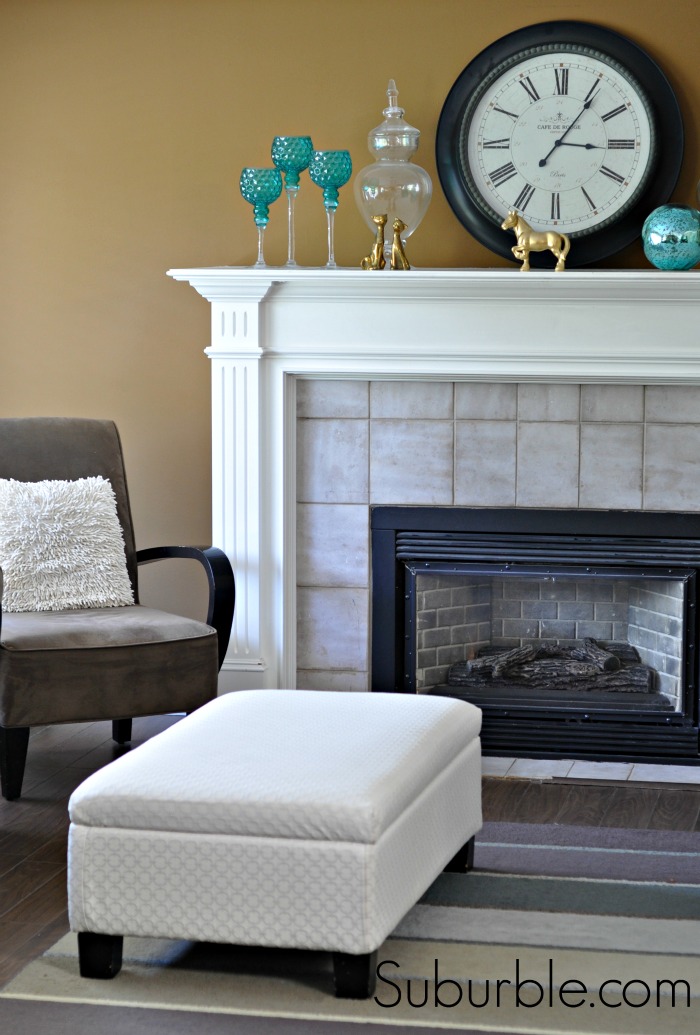
In its completed glory: my gorgeous cream-coloured fabric ottoman. No longer contagious with some sort of rashy leather-virus.
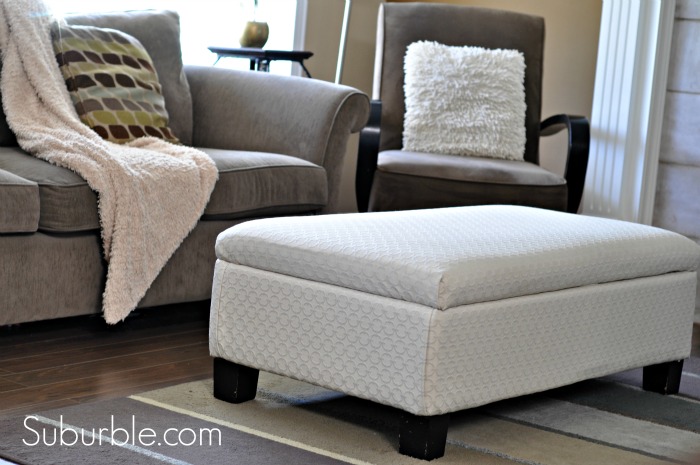
I think that it looks quite nice – and the lighter colour really does brighten up the room. I have always gravitated towards darker, autumn colours, but suddenly, I’m loving my flashy little ottoman and its “look at me” fabric!
And for you parents who are tsk-tsking me and saying, “Lady, you are going to regret that fabric when some sticky-handed monster leaves marks all over that ottoman. You will cry. Like… ugly cry…”, I say, Yeah. I will probably be disappointed. But, I bought the fabric on super-duper sale (in total, I paid $34 for all of the fabric), and I’ve learned how to reupholster this ottoman in a no-sew lazy way. If it’s destroyed, I can fix it. If I hate the colour one day, I can change it.
And when we have play dates at our house, I put a towel over it. I’m not kidding. I don’t take unnecessary risks.
If there is an ottoman who has been aching for a bit of a makeover in your house, I encourage you to try my Lazy Reulpholstering trick. If I can do it with two preschoolers as “helpers”, then you can most definitely do it!
Don’t Miss Another Suburble Upcycle! We love to save junk around here!
Blog – Facebook – Twitter – Pinterest
Tara


Tina @ Living Life Wright says
Tara thanks for sharing this! My daughter has an ottoman made just like yours and is waiting on me to upholster it. I guess I’ve been procrastinating due to fear, but you make it look relatively easy, so I guess I’ll just jump right in and see what I can do! LOL.
Beth says
Thanks for the informative and entertaining post Tara! I like your style!
Cindy @ Diy beautify says
I loved reading about your adventures doing this project!! Very funny, and it turned out beautiful:)
Darlene says
I love your choice in fabric – the texture really makes it. And it certainly brightens up the room. Fantastic tutorial.
Tara @ Suburble says
That’s my advice – just jump right in! Once it’s naked and shivering cold, you’ll HAVE to do something with it! (And it’s really not that hard!)
Tara @ Suburble says
Thank you so much, Beth! Maybe I’ll see you over on Suburble… I’m always trying to make the ugly into not-so-ugly (or even nice looking!)
Tara @ Suburble says
Oh, I’m glad you thought it was funny, Cindy! I try to keep my sense of humour when I’m in the middle of DIY-chaos! 🙂
Tara @ Suburble says
Thank you so much, Darlene! You’re so right – the textured pattern is HUGE when it comes to this fabric. I’m thrilled that you like it!
Amy @ StowandTellU says
I loved it the first time round, love it just as much this time! Great tutorial, Tara, and that fabric is gorgeous enough to be worth the risk ~ Amy